Generate A Tissue Mask Overlay
Overview
Problem solved: create a reusable raster tissue mask from a slide so later pipelines can filter tiles by tissue coverage without repeatedly decoding RGB tiles.
Use this example when:
- you do not already have a tissue mask overlay,
- you want a cheap reusable artifact for tile filtering or QC,
- or you want to customize the mask-generation filter chain.
Why This Approach
tissue_mask runs a pyvips filter pipeline over a whole-slide image and returns the mask image.
The default pipeline currently applies:
- grayscale conversion,
- Otsu thresholding,
- morphological closing,
- morphological opening.
That gives you a raster mask that can later be consumed by tile_overlay or tile_overlay_overlap.
Bundled example input
The figure below shows the intended result of this workflow: an original slide view, the corresponding binary tissue mask, and an overlay blend that makes the alignment easy to verify.
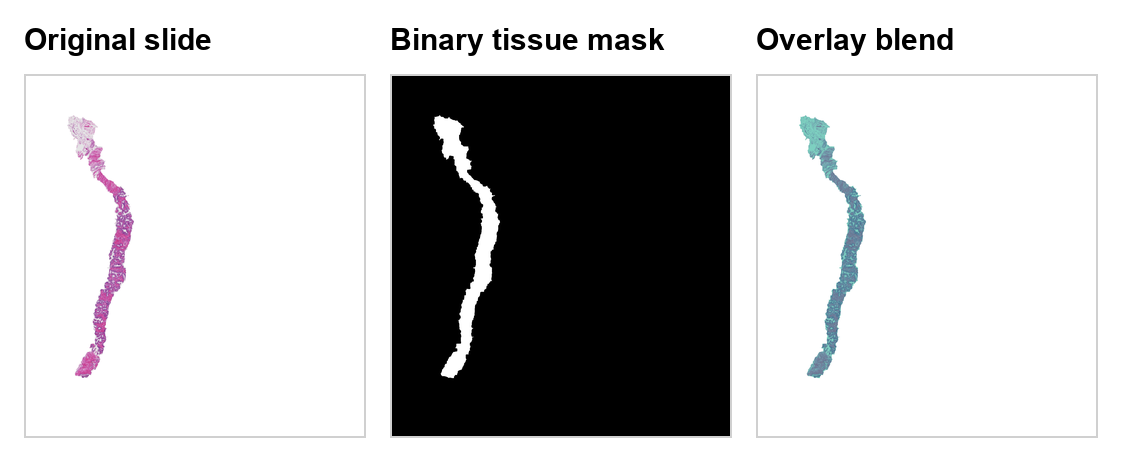 The included overlay file makes it easier to understand what
 tissue_mask is expected to produce before you generate your own mask outputs.
Example With The Default Filter
import pyvips

from ratiopath.masks import tissue_mask

slide = pyvips.Image.new_from_file("slide.ome.tif", access="sequential")

mask = tissue_mask(
    slide=slide,
    mpp=(8.0, 8.0),
)

mask.tiffsave(
    "slide_tissue_mask.tiff",
    tile=True,
    pyramid=True,
    bigtiff=True,
    compression="lzw",
)
Under the hood
tissue_mask itself is thin.
The actual behavior comes from the VipsFilter object you pass in.
With the default filter, the image is converted to grayscale, thresholded with multi-Otsu logic, and then cleaned up with morphology whose structuring-element size depends on the supplied mpp.
That mpp argument is important because the morphology radius is scaled in physical units rather than in raw pixel counts.
This makes the mask behavior more stable across slides processed at different resolutions.
Example With A Custom Filter Chain
import pyvips

from ratiopath.masks import tissue_mask
from ratiopath.masks.vips_filters import (
    VipsClosing,
    VipsCompose,
    VipsOpening,
    VipsOtsu,
    VipsSaturationFilter,
)

slide = pyvips.Image.new_from_file("slide.ome.tif", access="sequential")

custom_filter = VipsCompose(
    [
        VipsSaturationFilter(),
        VipsOtsu(),
        VipsOpening(disc_factor=6),
        VipsClosing(disc_factor=6),
    ]
)

mask = tissue_mask(
    slide=slide,
    mpp=(8.0, 8.0),
    filter=custom_filter,
)
Expected outputs
The custom-filter example returns an in-memory pyvips.Image mask.
If you save it, the output should be another aligned binary-like overlay that can be consumed by tile_overlay or tile_overlay_overlap.
Why customize the filter
The default grayscale path is a reasonable general-purpose choice, but some stains or scanner profiles separate tissue from background more cleanly in saturation space.
By switching the first stage to VipsSaturationFilter, you can keep the rest of the pipeline unchanged while changing the signal that drives thresholding.
How To Use The Output
After you save the mask, treat it as an aligned overlay in later tile pipelines. The snippet below rebuilds a tile metadata table and adds the saved mask path before computing overlap:
from typing import Any

from ray.data.expressions import col
from shapely.geometry import box

from ratiopath.ray import read_slides
from ratiopath.tiling import grid_tiles, tile_overlay_overlap


def expand_tiles(row: dict[str, Any]) -> list[dict[str, Any]]:
    return [
        {
            "path": row["path"],
            "tissue_mask_path": row["tissue_mask_path"],
            "tile_x": x,
            "tile_y": y,
            "mpp_x": row["mpp_x"],
            "mpp_y": row["mpp_y"],
            "tile_extent_x": row["tile_extent_x"],
            "tile_extent_y": row["tile_extent_y"],
        }
        for x, y in grid_tiles(
            slide_extent=(row["extent_x"], row["extent_y"]),
            tile_extent=(row["tile_extent_x"], row["tile_extent_y"]),
            stride=(row["stride_x"], row["stride_y"]),
            last="keep",
        )
    ]


slides = read_slides("data", mpp=0.5, tile_extent=512, stride=512)
slides = slides.map(
    lambda row: {
        **row,
        "tissue_mask_path": row["path"].replace(".ome.tif", "_tissue_mask.tiff"),
    }
)
tiles = slides.flat_map(expand_tiles)

roi = box(0, 0, 512, 512)

tiles = tiles.with_column(
    "tissue_overlap",
    tile_overlay_overlap(
        roi=roi,
        overlay_path=col("tissue_mask_path"),
        tile_x=col("tile_x"),
        tile_y=col("tile_y"),
        mpp_x=col("mpp_x"),
        mpp_y=col("mpp_y"),
    ),
)
This is usually cheaper than reading RGB tiles just to decide whether a patch is mostly background.